Flutter has become quite popular among app developers because -
Ease of development,
Cross-platform,
Declarative UI,
Hot reload,
and Native-like performance.
While we can build a fully functional application using Flutter, it's also possible to add Flutter to a fully functional native android application(and iOS application). In this article, we'll look into exactly that -
We can add Flutter into our existing apps as -
Activity
Fragment
View
In this article, I'll be covering FlutterActivity and FlutterFragment. I'll make another article covering FlutterView using RecyclerView adapter.
In the example code snippets, I'll be using Kotlin.
Setup Flutter module using Android Studio
We'll need to add a new module to our existing project by doing-
First, add the Flutter plugin to Android Studio.
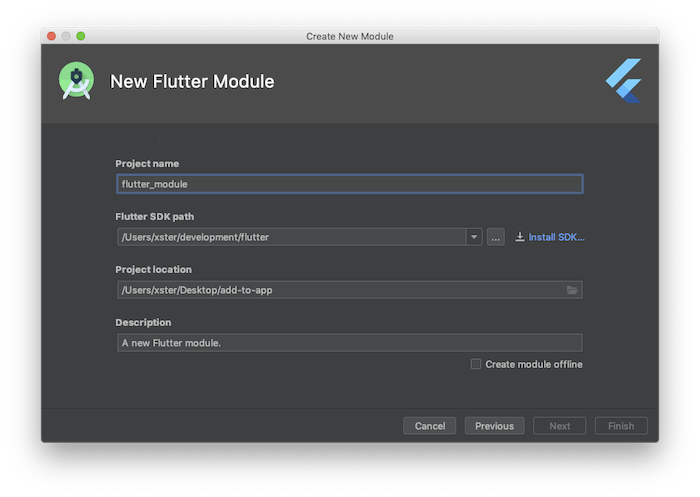
Then in your existing project - File > New > New Module > Flutter Module and then complete the module setup wizard.

Add a single Flutter screen as Activity
In flutter, we inflate a widget (everything in Flutter is a widget) using the runApp function by doing this -
void main() => runApp(const MyApp());
Let's say we want to do the same from our existing app as an activity we can do this -
fun navigateToFlutterActivity() {
        startActivity(
            FlutterActivity
                .createDefaultIntent(this)
        )
    }
Make sure FlutterActivity is imported.
import io.flutter.embedding.android.FlutterActivity
**Result - **

We'll notice some delay in inflating the widget 😕. This is because flutter runs on Flutter Engine which has a non-trivial warm-up time, what we can do is pre-cache the engine and use that to inflate the widget.
For this, we'll use a cached FlutterEngine.
Adding a single Flutter Screen with Cached FlutterEngine as Activity
First, declare the FlutterEngine in the application class as follows -
class AndroidAndFlutterApplication : Application() {
    private lateinit var flutterEngine: FlutterEngine

    override fun onCreate() {
        super.onCreate()
        flutterEngine = FlutterEngine(this)

        flutterEngine.dartExecutor.executeDartEntrypoint(
            DartExecutor.DartEntrypoint.createDefault()
        )

        FlutterEngineCache
            .getInstance()
            .put("engineID", flutterEngine)
     }
}
Engine id parameter can we whatever we want, we'll need it later to uniquely identify the FlutterEngine.
Now we can use this FlutterEngine by simply using .withCachedEngine() builder as -
startActivity(
    FlutterActivity
      .withCachedEngine("engineID")
      .build(this)
  )
**Result - **

Now there is no delay. 😊
Adding a Flutter Screen as Fragment
Similarly, we can add a Flutter screen as a fragment in our existing application with/without a pre-cached engine. Here I'll be using the same FlutterEngine as in FlutterActivity example.
class FlutterFragmentContainerActivity : AppCompatActivity() {
    companion object {
        // Define a tag String to represent the FlutterFragment within
        // this Activity's FragmentManager.
        private const val TAG_FLUTTER_FRAGMENT = "flutter_fragment"
    }

    private var flutterFragment: FlutterFragment? = null
    override fun onCreate(savedInstanceState: Bundle?) {
        super.onCreate(savedInstanceState)
        setContentView(R.layout.activity_flutter_fragment_container)

         // Attempt to find an existing FlutterFragment,
         // in case this is not the first time that onCreate() was run.
        flutterFragment = supportFragmentManager
            .findFragmentByTag(TAG_FLUTTER_FRAGMENT) as FlutterFragment?
        if (flutterFragment == null) {
        val newFlutterFragment =
            FlutterFragment.withCachedEngine("engineID")
            .build<FlutterFragment>()
        flutterFragment = newFlutterFragment

        supportFragmentManager
            .beginTransaction()
            .add(
                R.id.fragmentContainer,
                newFlutterFragment
            )
            .commit()
        }
    }
Make sure FlutterFragment is imported.
import io.flutter.embedding.android.FlutterFragment
Navigating to a specific Flutter widget
Let's see we don't want to open the default Fluttermain() => runApp(), instead we want to specify some entry point to inflate.
We can do that too. First, we need to define a pragma that indicates the Dart compiler that our function will be used in native code. Inmain.dart define -
@pragma('vm:forSpecificRoute')
void specificRoute() => runApp(const AppWithSpecificRoute());
Now we'll define a FlutterEngine and pass the
// Instantiate a FlutterEngine.
        flutterEngine = FlutterEngine(this)

        // Start executing Dart code to pre-warm the FlutterEngine.
        flutterEngine.dartExecutor.executeDartEntrypoint(
            DartExecutor.DartEntrypoint(
                FlutterMain.findAppBundlePath(), "specificRoute"
            )
        )

        // Cache the FlutterEngine to be used by FlutterActivity.
        FlutterEngineCache
            .getInstance()
            .put("engineID", flutterEngine)
Now we can use this FlutterEngine to inflate a specific widget.
I hope you found this article useful, you can find the source code here.
Follow me for more articles like this. Have a great day! 😊

